In an attempt to centralize information, as of the 2008 Season, we are no longer distributing the Bed-Stuy CSA Newsletter via Blogger.
Please read our 2008 Season newsletters on our website.
You can still access the complete archive of our 2007 Season newsletters at: http://bedstuycsa.blogspot.com/
Visit our website:
http://bedstuycsa.wetpaint.com/
Friday, June 27, 2008
Saturday, September 22, 2007
September 22nd Newsletter: Potluck Picnic today!
CSA Week 15, Cycle A pick up
Bed-Stuy CSA Potluck and Veggie BBQ TODAY
Saturday, September 22, 12noon - as long as you want.
Join us for a potluck and BBQ in Herbert Von King Park (on Lafayette Ave,
between Marcy and Tompkins)
Bring your CSA veggies, ice tea, lemonade, music, soccer ball or anything
else you would like to contribute to a day of rest and relaxation in the
park. We'll be grilling, chilling and silk screening. So, don't forget to bring
a blank t-shirt to get printed with an original CSA logo design.
If you have any questions, feel free to call Canek at 805 415-8283.
What's new this week?
Info from Watch Your Garden Grow
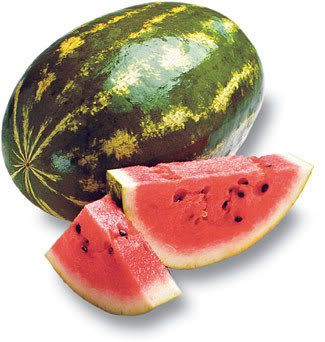
Watermelon is truly one of summertime’s sweetest treats. It is fun to eat, and good for you. Watermelon seeds were brought to this country by enslaved Africans. Today there are more than 100 different varieties of watermelons.
Storage: Uncut watermelon can be stored for about 2 weeks at room temperature especially if the temperature is about 45 to 50°. Uncut watermelons have a shorter refrigerator life, so store at room temperature until ready to chill and eat. Tightly cover cut pieces in plastic wrap and store in the refrigerator for 2 to 3 days.
Nutrition: Watermelons are low in calories and very nutritious. Watermelon is high in lycopene, second only to tomatoes. Recent research suggests that lycopene, a powerful antioxidant, is effective in preventing some forms of cancer and cardiovascular disease. According to research conducted at the University of North Carolina at Chapel Hill, men who consumed a lycopene-rich diet were half as likely to suffer a heart attack as those who had little or no lycopene in their diets.
Watermelon is also high in Vitamin C and Vitamin A, in the form of disease fighting beta-carotene. Research also suggests that the red pigmented foods provide this protection. Lycopene and beta-carotene work in conjunction with other plant chemicals not found in vitamin/mineral supplements. Potassium is also available, which is believed to help control blood pressure and possibly prevent strokes.
Nutrition Facts (1 wedge, or 1/16 of a melon, about 1-2/3 cup)
Calories 91.52
Protein 1.77 grams
Carbohydrates 20.54 grams
Dietary Fiber 1.43 grams
Potassium 331.76 mg
Vitamin C 27.46 mg
Vitamin A 1046.76 IU
Preparation: The National Watermelon Promotion Board suggests washing whole watermelons with clean water before slicing to remove potential bacteria. The flavor of watermelon is best enjoyed raw. Heating diminishes the flavor and softens the texture. Watermelon tastes best icy cold in fruit smoothies, slushes or simply eaten from the rind.
To make melon balls, cut the watermelon in half lengthwise then into quarters. Watermelon balls can be scooped right out of rind. Create perfect balls, using a melon baller, and a twist of the wrist. The watermelon shell can be used to hold the melon balls as well as other fruit. Watermelon punch is also served from the hallow rind. By sitting the round end inside a ring or bowl, the shell will remain stable during serving.
To remove seeds, cut each quarter in half again. With the flesh of each wedge on top and the rind sitting on the counter, look for the row of seeds along the flesh of each wedge. Using a sharp knife, cut along the seed line and remove the flesh just above it. Scrape the seeds from the remaining piece.
Seeded watermelon chunks can be frozen to use in watermelon slushes or fruit smoothies. Watermelon sorbet or granita stays fresh in the freezer for up to 3 months. The difference between a sorbet and a granita is in the texture. Sorbets are smooth, whereas granitas are coarse. You do not need an ice cream maker to make a granita. The best way to enjoy watermelon is while they are fresh and sweet. When they are gone, they are gone until next summer.
Recipes
Watermelon Granita
From Watch Your Garden Grow
Watermelon Smoothie
From Watch Your Garden Grow
Process until smooth and frothy. Serve in tall glasses with a straw. Makes 4 servings.
Watermelon Mojito
Selected by Retu
Makes 4 drinks
Butternut Squash Soup
Selected by Retu
Video Recipe for Kid-Friendly Butternut Squash Mac n Cheese
Click this link if you can't see the video
Butternut Squash with Creamy Tofu, Thyme and Walnut Stuffing
from Christine Cooks blog
from Eden Foods website
Bed-Stuy CSA Potluck and Veggie BBQ TODAY
Saturday, September 22, 12noon - as long as you want.
Join us for a potluck and BBQ in Herbert Von King Park (on Lafayette Ave,
between Marcy and Tompkins)
Bring your CSA veggies, ice tea, lemonade, music, soccer ball or anything
else you would like to contribute to a day of rest and relaxation in the
park. We'll be grilling, chilling and silk screening. So, don't forget to bring
a blank t-shirt to get printed with an original CSA logo design.
If you have any questions, feel free to call Canek at 805 415-8283.
What's new this week?
Info from Watch Your Garden Grow
Watermelon is truly one of summertime’s sweetest treats. It is fun to eat, and good for you. Watermelon seeds were brought to this country by enslaved Africans. Today there are more than 100 different varieties of watermelons.
Storage: Uncut watermelon can be stored for about 2 weeks at room temperature especially if the temperature is about 45 to 50°. Uncut watermelons have a shorter refrigerator life, so store at room temperature until ready to chill and eat. Tightly cover cut pieces in plastic wrap and store in the refrigerator for 2 to 3 days.
Nutrition: Watermelons are low in calories and very nutritious. Watermelon is high in lycopene, second only to tomatoes. Recent research suggests that lycopene, a powerful antioxidant, is effective in preventing some forms of cancer and cardiovascular disease. According to research conducted at the University of North Carolina at Chapel Hill, men who consumed a lycopene-rich diet were half as likely to suffer a heart attack as those who had little or no lycopene in their diets.
Watermelon is also high in Vitamin C and Vitamin A, in the form of disease fighting beta-carotene. Research also suggests that the red pigmented foods provide this protection. Lycopene and beta-carotene work in conjunction with other plant chemicals not found in vitamin/mineral supplements. Potassium is also available, which is believed to help control blood pressure and possibly prevent strokes.
Nutrition Facts (1 wedge, or 1/16 of a melon, about 1-2/3 cup)
Calories 91.52
Protein 1.77 grams
Carbohydrates 20.54 grams
Dietary Fiber 1.43 grams
Potassium 331.76 mg
Vitamin C 27.46 mg
Vitamin A 1046.76 IU
Preparation: The National Watermelon Promotion Board suggests washing whole watermelons with clean water before slicing to remove potential bacteria. The flavor of watermelon is best enjoyed raw. Heating diminishes the flavor and softens the texture. Watermelon tastes best icy cold in fruit smoothies, slushes or simply eaten from the rind.
To make melon balls, cut the watermelon in half lengthwise then into quarters. Watermelon balls can be scooped right out of rind. Create perfect balls, using a melon baller, and a twist of the wrist. The watermelon shell can be used to hold the melon balls as well as other fruit. Watermelon punch is also served from the hallow rind. By sitting the round end inside a ring or bowl, the shell will remain stable during serving.
To remove seeds, cut each quarter in half again. With the flesh of each wedge on top and the rind sitting on the counter, look for the row of seeds along the flesh of each wedge. Using a sharp knife, cut along the seed line and remove the flesh just above it. Scrape the seeds from the remaining piece.
Seeded watermelon chunks can be frozen to use in watermelon slushes or fruit smoothies. Watermelon sorbet or granita stays fresh in the freezer for up to 3 months. The difference between a sorbet and a granita is in the texture. Sorbets are smooth, whereas granitas are coarse. You do not need an ice cream maker to make a granita. The best way to enjoy watermelon is while they are fresh and sweet. When they are gone, they are gone until next summer.
Recipes
Watermelon Granita
From Watch Your Garden Grow
- 5 cups seeded watermelon pulp
- 1 cup sugar syrup*
- 2 tablespoons fresh lemon juice
- Thin watermelon wedges, cut into strips for a garnish
- Puree watermelon in a food processor.
- Pour into a 9 x 13 inch baking dish. Stir in the syrup and lemon juice. Freeze for about 4 hours or until frozen solid.
- To serve, scrape up granita with a large spoon and place in goblets, tulip shaped wine glasses or ice cream dishes. Garnish with a narrow wedge of watermelon. Makes 4 servings.
Watermelon Smoothie
From Watch Your Garden Grow
- 1 8 ounce lemon yogurt
- 3 cups cubed, seeded watermelon
- 1 pint fresh strawberries, cleaned and hulled
- 1 tablespoon honey, agave nectar, or strawberry jam
- 3 ice cubes
Process until smooth and frothy. Serve in tall glasses with a straw. Makes 4 servings.
Watermelon Mojito
Selected by Retu
Makes 4 drinks
- 20 mint leaves, chopped
- 2 tablespoons superfine sugar
- 1/2 cup fresh lime juice
- Crushed ice
- 3/4 cup light rum
- 6 ounces seedless watermelon, pureed
Butternut Squash Soup
Selected by Retu
- 1 butternut squash, peeled
- Nutmeg
- 2 tablespoons unsalted butter
- Salt and pepper
- 1 onion, chopped
- 6 cups chicken stock
Video Recipe for Kid-Friendly Butternut Squash Mac n Cheese
Click this link if you can't see the video
Butternut Squash with Creamy Tofu, Thyme and Walnut Stuffing
from Christine Cooks blog
- 1 medium butternut squash
- 1 14-ounce block firm organic tofu, cut into 1/2-inch cubes
- 1 onion, diced small
- 3 cloves garlic, minced
- 3/4 cup walnuts, toasted and coarsely chopped
- 2 teaspoons dried thyme
- 1/4 teaspoon cinnamon
- a pinch of cayenne
- 2 tablespoons dry vermouth
- 1/2 cup 1/2 & 1/2*
- Kosher salt and freshly ground black pepper to taste
- olive oil and Earth Balance** for the pan
- Heat the oven to 350 degrees.
- Cut the stem end from the squash and discard. Cut the squash in half lengthwise.
- Scoop out the seeds with a spoon and then cut each piece in half crosswise, leaving the scooped out portion intact.
- Place all 4 pieces in a roasting pan, skin side down. Fill the pan with just enough water to cover the bottom of the pan. Sprinkle the squash with salt and pepper. Cover the pan with foil and put in the oven for 45 minutes to one hour, or until the squash is tender.
- You can remove the foil during the last few minutes to let any water left in the pan evaporate.
- When cooked, remove the squash from the oven and tent with foil to keep warm.
- Meanwhile, in a heavy skillet over medium heat, saute the onions in a small amount of olive oil and Earth Balance until they are very soft.
- Add the garlic, thyme, cinnamon and cayenne and stir for a few minutes more.
- Add the tofu to the pan and gently stir (avoid breaking up the cubes) until it has heated through.
- Pour in the vermouth and cook, stirring, until the liquid evaporates.
- Add the walnuts.
- Pour in the 1/2 & 1/2 and cook, stirring, until the sauce thickens.
- Remove from the heat and season to taste with kosher salt and freshly ground black pepper.
- To serve***, mound spoonfuls of the tofu mixture into each squash cavity, sprinkle with shaved parmesan (optional), surround with a green salad and enjoy.
from Eden Foods website
- 1 medium butternut squash, leave whole
- 12 ounces Eden Organic Kamut & Quinoa Twisted Pair® Gemelli (any whole-grain bited sized pasta can be substituted)
- 1 Tablespoon Extra Virgin Olive Oil
- 1 medium onion, diced
- 2 cloves garlic, minced
- 3 cups vegetable stock
- 4 cups kale, stems removed, chopped
- 1/2 teaspoon salt
- 1/8 teaspoon freshly ground black pepper, or to taste
- 1/2 cup tamari roasted Almonds, whole or coarsely chopped
Sunday, September 16, 2007
September 16th Newsletter: Corn on the Blog.
CSA Week 14, Cycle B pick-up
Important CSA News
The CSA 2007 season ends on October 29th!
What's new this week?
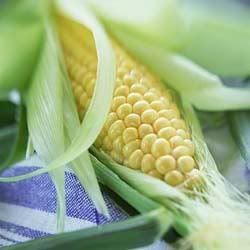
Corn is a versatile vegetable that is especially popular in Latin American cuisine. In addition to the kernels, the husks can be used for tamales, a popular Mexican dish in which various fillings, such as finely chopped meat, vegetables, and/or fruits are wrapped in a cooked cornmeal layer rolled up in the softened cornhusks.
The word corn can be traced to an Indoeuropean word that was translated to mean “small nugget,” while the Native Americans called the plant mahiz.
Selection and Storage: Good quality white or yellow corn should have fresh green, tightly fitting husks, with golden brown silk, and tip ends that are free of decay. Ears should be evenly covered with plump, consistently sized kernels. Avoid corn that has been on display with husks pulled back, or with discolored or dry-looking husks, stem ends, or kernels.
It’s best to cook corn as soon as possible after it is picked or purchased. This is because, after being picked, the corn’s natural sugars gradually convert to starch, which, in turn, lessens the corn’s natural sweetness.
If you must store corn, use perforated plastic bags and get it into the refrigerator as soon as possible. Try to use the corn within 1 to 2 days and do not husk until just prior to cooking.
Preparation, uses, and tips: Fresh sweet corn must be cooked and is generally steamed or boiled and served as a side dish.
To boil, bring a large pot of water to bubble over high heat. Cook in batches, with husks and silks removed, adding a few ears at a time, so the water continues boiling. For fresh young corn, cook for 30 seconds—just long enough to heat the corn through; boil more mature corn for up to three minutes. Do not add salt to cooking water since that will toughen the corn.
To steam, remove husks, arrange corn on a steaming rack, and place the rack over about 1 inch (2.5cm) of water. Bring to a boil, cover, and steam for about 10 minutes.
Grilled corn on the cob is a summertime favorite. (The cob or the ear of the corn plant is actually a branch.) First, peel back the husks and remove the silk, then bring the husk back over the cob. Soak the corn ears in their husks in cold water for a few hours before grilling—this moisture will let the corn steam as it grills, making it juicier. To grill, wrap each ear of corn tightly in aluminum foil, place on a prepared preheated medium-hot grill, and cook for about 30 minutes, turning occasionally, until corn is tender. Serve hot off the grill, with butter or margarine, if desired.
You can also roast corn in the oven. Preheat oven to 350 degrees. Then simply place the corn (while it's still in its husk) directly on the oven rack and roast for 30 minutes. Peel back husks and enjoy.
Corn husks are used primarily in making tamales, but they are also used to wrap other foods for steaming.
Fresh corn kernels may be used as an ingredient in soups, stews, casseroles, puddings, relishes, and breads.
Sweet corn is high in fiber, niacin, folate and some vitamin A. Folate has been found to prevent neural-tube birth defects and current research suggests that it helps to reduce the risk of heart disease and stroke. Fiber, of course, helps to keep the intestinal track running smoothly.
Nutrition Facts (Serving size: 1 ear yellow sweet corn )
Calories 83.16
Protein 2.56 grams
Carbohydrates 19.3 grams
Dietary Fiber 2.15 grams
Potassium 191.73 mg
Vitamin A 167 IU
Niacin 1.24 mg
Folate 35.73 mcg
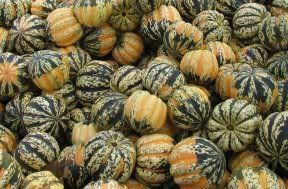
Carnival Squash, one type of Winter Squash, pictured.
"Winter Squash" are hardy vegetables that are neither grown nor harvested in the winter, as the name seems to imply--they grow on frost-tender vines and are actually picked in the fall and stored until spring. Because of their hard, thick skins, they have the ability to keep through the cold winter months, a quality that made this member of the gourd family a staple vegetable before the days of modern shipping and freezing techniques. Under their hard skins, winter squash have large seeds and firm, deep-yellow or orange flesh.
The most common varieties of winter squash include acorn, buttercup, butternut, hubbard, pumpkin, spaghetti, and turban. Other varieties include calabaza, cushaw, delicata, golden nugget, kabocha, and vegetable marrow.
Buying and storing tips: Choose heavy squash with a smooth, hard, richly colored rind. Store winter squash for up to a week in a paper bag in the refrigerator, or in a cool, dry place for several weeks. Don’t store winter squash in plastic bags, because the plastic traps moisture and encourages spoilage and rot.
Preparation, uses, and tips: Wash the exterior of the squash just before using. Winter squash is best baked, but it can also be steamed or boiled. Cut butternut, acorn, or other winter squash in half lengthwise, scoop out and discard the seeds, and place squash halves, flesh-side-down, in a baking dish. Add 1/4-inch (0.6cm) of hot water, cover, and bake until tender. Scoop out flesh and purée with garlic, basil, and olive oil or butter. Winter squash can also be stuffed with seasoned bread cubes and seafood or cheese mixtures.
Nutritional Highlights: Winter squash, 1 squash (raw, acorn)
Calories: 172
Protein: 3.4g
Carbohydrate: 44.9g
Total Fat: 0.43g
Fiber: 6.46g
*Excellent source of: Magnesium (138mg), Potassium (1,495mg), Vitamin C (47mg), and Vitamin A (1,454 IU)
*Good source of: Calcium (142mg)
Much more info on all varieties of squash can be found here.
Recipes
Selected by Retu, unless otherwise noted.
Corn and tomato salad with cilantro dressing
Submitted by Rebecca, originally from Bon Appetit - July 2006
Makes 6 servings.
Combine in large bowl:
Everyday Chipotle Vegetable Tamales
Selected by Olivia. From the Post Punk Kitchen.
Makes 24-30 tamales.
This tamale recipe is as flexible as you want it to be; add roasted corn kernels, finely chopped chilies or scallions to the dough if you feel like it. I’ve kept the filling a basic bean, peppers and corn with essential addition of smoky chipotle chilies in spicy adobo sauce. Seasonal vegetables like zucchini, finely chopped steamed pumpkin, poblano chilies and even small bits of sautéed seitan would make perfect additions too.
Tamale Tips:
Canned chipotles in adobo sauce, corn husks and masa harina can be found in most large groceries with an “ethnic” section nowadays. Larger Latin American stores may have everything in stock too, as well as gourmet stores. Be sure to get masa harina mix (ground corn flour specially treated with lime water); don’t substitute with corn meal, it simply is not the same and will not work!
While preparing the dough and filling is simple enough I will not lie to you; tamale assembly can be tedious work. Don’t do it on 2 hours of sleep after pulling an all nighter, or an hour before that big date or before surgery. Enlist the help of a dear friend and promise them the warm, soul-embracing experience of eating adorably wrapped handmade tamales bursting with vegan love. Which means you’ll have to give them a few you greedy mustard.
Tamales freeze well after steaming, just wrap tightly in paper and pack in freezer bags.
If you can’t find dried corn husks for wrapping the tamales is, less attractive substitutes might be tinfoil or wax paper.
Dough:
4 Cups Masa Harina tamale flour
1/4 Cup olive or good quality corn oil
2 tsp. Baking powder
4 Cups vegetable broth, water or a combination of the two, warmed
Salt to taste (needed less if using all broth)
Chipotle bean filling:
2 Tablespoons Olive Oil
1 large onion, finely chopped
1 clove garlic, minced
1 red bell pepper, seeded and chopped small
1 small carrot, peeled and diced small
1 Cup frozen corn kernels
1 15oz. Can pinto or black beans, drained & rinsed
1/4 C veggie broth or water
2 chipotle peppers in adobo sauce, minced, plus 1-2 T of adobo sauce (from a 7oz can of chipotles in sauce)
3 Tablespoon tomato paste
1 tsp ground cumin
Salt to taste
Dried corn husks for wrapping tamales
First, place corn husks (you don’t need to separate them just now) in a pot large enough to cover completely with water. Cover with warm water and allow to soak for at least 20 minutes till husks are soft and pliable. Keep covered in water entire time as you use them.
In a large bowl combine masa harina, broth or water, salt, baking powder and oil. Stir to mix with a large spatula. If you have an electric mixer (hand or otherwise) now is the time to use it. Beat the mixture till it forms a dense, moist, fluffy dough and the side of the bowls are clean. If you don’t have a mixer beat it like hell with that spatula. Tamale dough steams up extra light and puffy when beat with an electric mixer but still tastes great when beat by hand. Cover bowl containing dough with plastic wrap or a damp towel and set aside.
In a large heavy bottom skillet heat olive oil over medium high heat. Add onions and garlic and sauté for 5 minutes. Add pepper and carrot and sauté for 3 minutes, then add beans, corn, broth, chipotles (the more chipotles and sauce the hotter) and adobo sauce, tomato paste and cumin. Sautee and simmer till most of liquid evaporates, about 8 minutes. Salt to taste and allow to cool before assembling tamales.
Depending the size of the corn husks you will need to use 1-2 husks per tamale. There are a billion ways to wrap a tamale: I like this way since it’s simple and makes super-cute traditional tamale shapes. Take corn husk and lay flat; spread about 2 T of dough about off-center, leaving about an inch and a half of space on the top and bottom. Spread a heaping tablespoon of filling on top, and on top of that dab about 1 T more of dough. Carefully roll up tamale, making sure to completely encase filling in corn husk. Tie both ends securely with either heavy duty kitchen string (maybe try different colors for different flavors), or simply tear a corn husk lenghth-wise into thin strips.
Prepare a large steamer basket and loosely pack tamales into it. Steam for 35-40 minutes. Tamales will expand and feel firm to the touch when done. Remove from heat and allow to cool slightly before serving (they will be really hot when unwrapped!). Serve with your favorite salsa, guacamole or make a whole affair out of it and serve with sides of rice and beans.
Creole Style Corn, Okra, and Tomatoes
Selected by Olivia. Adapted From VeganCehf.com.
Serves 6-8
Basic Potato Salad
Serves 8
Radish Hot & Sour Soup
Serves 4-6
In a large saucepan over medium heat, bring stock to a boil. Stir in vinegar, sugar, cayenne and ginger. Add shrimp and cook until shrimp turn pink and curl, about 3-4 minutes. Turn off heat, stir in radishes, spinach and green onions. Cover and let stand 2-3 minutes before serving.
Baked Stuffed Tomatoes
For Stuffing:
Cook chopped onion, green pepper, and celery in the margarine for 5 minutes, or until tender, stirring occasionally.
"Three Sisters" Stew
Selected by Olivia. From In a Vegetarian Kitchen.
6 servings
In Native American mythology, squash, corn, and beans are known as of the "three sisters."
Important CSA News
The CSA 2007 season ends on October 29th!
What's new this week?
Corn is a versatile vegetable that is especially popular in Latin American cuisine. In addition to the kernels, the husks can be used for tamales, a popular Mexican dish in which various fillings, such as finely chopped meat, vegetables, and/or fruits are wrapped in a cooked cornmeal layer rolled up in the softened cornhusks.
The word corn can be traced to an Indoeuropean word that was translated to mean “small nugget,” while the Native Americans called the plant mahiz.
Selection and Storage: Good quality white or yellow corn should have fresh green, tightly fitting husks, with golden brown silk, and tip ends that are free of decay. Ears should be evenly covered with plump, consistently sized kernels. Avoid corn that has been on display with husks pulled back, or with discolored or dry-looking husks, stem ends, or kernels.
It’s best to cook corn as soon as possible after it is picked or purchased. This is because, after being picked, the corn’s natural sugars gradually convert to starch, which, in turn, lessens the corn’s natural sweetness.
If you must store corn, use perforated plastic bags and get it into the refrigerator as soon as possible. Try to use the corn within 1 to 2 days and do not husk until just prior to cooking.
Preparation, uses, and tips: Fresh sweet corn must be cooked and is generally steamed or boiled and served as a side dish.
To boil, bring a large pot of water to bubble over high heat. Cook in batches, with husks and silks removed, adding a few ears at a time, so the water continues boiling. For fresh young corn, cook for 30 seconds—just long enough to heat the corn through; boil more mature corn for up to three minutes. Do not add salt to cooking water since that will toughen the corn.
To steam, remove husks, arrange corn on a steaming rack, and place the rack over about 1 inch (2.5cm) of water. Bring to a boil, cover, and steam for about 10 minutes.
Grilled corn on the cob is a summertime favorite. (The cob or the ear of the corn plant is actually a branch.) First, peel back the husks and remove the silk, then bring the husk back over the cob. Soak the corn ears in their husks in cold water for a few hours before grilling—this moisture will let the corn steam as it grills, making it juicier. To grill, wrap each ear of corn tightly in aluminum foil, place on a prepared preheated medium-hot grill, and cook for about 30 minutes, turning occasionally, until corn is tender. Serve hot off the grill, with butter or margarine, if desired.
You can also roast corn in the oven. Preheat oven to 350 degrees. Then simply place the corn (while it's still in its husk) directly on the oven rack and roast for 30 minutes. Peel back husks and enjoy.
Corn husks are used primarily in making tamales, but they are also used to wrap other foods for steaming.
Fresh corn kernels may be used as an ingredient in soups, stews, casseroles, puddings, relishes, and breads.
Sweet corn is high in fiber, niacin, folate and some vitamin A. Folate has been found to prevent neural-tube birth defects and current research suggests that it helps to reduce the risk of heart disease and stroke. Fiber, of course, helps to keep the intestinal track running smoothly.
Nutrition Facts (Serving size: 1 ear yellow sweet corn )
Calories 83.16
Protein 2.56 grams
Carbohydrates 19.3 grams
Dietary Fiber 2.15 grams
Potassium 191.73 mg
Vitamin A 167 IU
Niacin 1.24 mg
Folate 35.73 mcg
Carnival Squash, one type of Winter Squash, pictured.
"Winter Squash" are hardy vegetables that are neither grown nor harvested in the winter, as the name seems to imply--they grow on frost-tender vines and are actually picked in the fall and stored until spring. Because of their hard, thick skins, they have the ability to keep through the cold winter months, a quality that made this member of the gourd family a staple vegetable before the days of modern shipping and freezing techniques. Under their hard skins, winter squash have large seeds and firm, deep-yellow or orange flesh.
The most common varieties of winter squash include acorn, buttercup, butternut, hubbard, pumpkin, spaghetti, and turban. Other varieties include calabaza, cushaw, delicata, golden nugget, kabocha, and vegetable marrow.
Buying and storing tips: Choose heavy squash with a smooth, hard, richly colored rind. Store winter squash for up to a week in a paper bag in the refrigerator, or in a cool, dry place for several weeks. Don’t store winter squash in plastic bags, because the plastic traps moisture and encourages spoilage and rot.
Preparation, uses, and tips: Wash the exterior of the squash just before using. Winter squash is best baked, but it can also be steamed or boiled. Cut butternut, acorn, or other winter squash in half lengthwise, scoop out and discard the seeds, and place squash halves, flesh-side-down, in a baking dish. Add 1/4-inch (0.6cm) of hot water, cover, and bake until tender. Scoop out flesh and purée with garlic, basil, and olive oil or butter. Winter squash can also be stuffed with seasoned bread cubes and seafood or cheese mixtures.
Nutritional Highlights: Winter squash, 1 squash (raw, acorn)
Calories: 172
Protein: 3.4g
Carbohydrate: 44.9g
Total Fat: 0.43g
Fiber: 6.46g
*Excellent source of: Magnesium (138mg), Potassium (1,495mg), Vitamin C (47mg), and Vitamin A (1,454 IU)
*Good source of: Calcium (142mg)
Much more info on all varieties of squash can be found here.
Recipes
Selected by Retu, unless otherwise noted.
Corn and tomato salad with cilantro dressing
Submitted by Rebecca, originally from Bon Appetit - July 2006
Makes 6 servings.
Combine in large bowl:
- 3 cups fresh corn kernels (cut from about 6 small ears of corn)
- 5 medium tomatoes, halved, seeded, chopped
- 2/3 cup finely chopped red onion
- 1/4 cup olive oil
- 1/4 cup chopped fresh cilantro
- 2 tablespoons chopped fresh mint
- 2 tablespoons white wine vinegar
- 1 tablespoon fresh lime juice
- 2 teaspoons (packed) golden brown sugar
- 1 garlic clove
- Salt and pepper
Everyday Chipotle Vegetable Tamales
Selected by Olivia. From the Post Punk Kitchen.
Makes 24-30 tamales.
This tamale recipe is as flexible as you want it to be; add roasted corn kernels, finely chopped chilies or scallions to the dough if you feel like it. I’ve kept the filling a basic bean, peppers and corn with essential addition of smoky chipotle chilies in spicy adobo sauce. Seasonal vegetables like zucchini, finely chopped steamed pumpkin, poblano chilies and even small bits of sautéed seitan would make perfect additions too.
Tamale Tips:
Canned chipotles in adobo sauce, corn husks and masa harina can be found in most large groceries with an “ethnic” section nowadays. Larger Latin American stores may have everything in stock too, as well as gourmet stores. Be sure to get masa harina mix (ground corn flour specially treated with lime water); don’t substitute with corn meal, it simply is not the same and will not work!
While preparing the dough and filling is simple enough I will not lie to you; tamale assembly can be tedious work. Don’t do it on 2 hours of sleep after pulling an all nighter, or an hour before that big date or before surgery. Enlist the help of a dear friend and promise them the warm, soul-embracing experience of eating adorably wrapped handmade tamales bursting with vegan love. Which means you’ll have to give them a few you greedy mustard.
Tamales freeze well after steaming, just wrap tightly in paper and pack in freezer bags.
If you can’t find dried corn husks for wrapping the tamales is, less attractive substitutes might be tinfoil or wax paper.
Dough:
4 Cups Masa Harina tamale flour
1/4 Cup olive or good quality corn oil
2 tsp. Baking powder
4 Cups vegetable broth, water or a combination of the two, warmed
Salt to taste (needed less if using all broth)
Chipotle bean filling:
2 Tablespoons Olive Oil
1 large onion, finely chopped
1 clove garlic, minced
1 red bell pepper, seeded and chopped small
1 small carrot, peeled and diced small
1 Cup frozen corn kernels
1 15oz. Can pinto or black beans, drained & rinsed
1/4 C veggie broth or water
2 chipotle peppers in adobo sauce, minced, plus 1-2 T of adobo sauce (from a 7oz can of chipotles in sauce)
3 Tablespoon tomato paste
1 tsp ground cumin
Salt to taste
Dried corn husks for wrapping tamales
First, place corn husks (you don’t need to separate them just now) in a pot large enough to cover completely with water. Cover with warm water and allow to soak for at least 20 minutes till husks are soft and pliable. Keep covered in water entire time as you use them.
In a large bowl combine masa harina, broth or water, salt, baking powder and oil. Stir to mix with a large spatula. If you have an electric mixer (hand or otherwise) now is the time to use it. Beat the mixture till it forms a dense, moist, fluffy dough and the side of the bowls are clean. If you don’t have a mixer beat it like hell with that spatula. Tamale dough steams up extra light and puffy when beat with an electric mixer but still tastes great when beat by hand. Cover bowl containing dough with plastic wrap or a damp towel and set aside.
In a large heavy bottom skillet heat olive oil over medium high heat. Add onions and garlic and sauté for 5 minutes. Add pepper and carrot and sauté for 3 minutes, then add beans, corn, broth, chipotles (the more chipotles and sauce the hotter) and adobo sauce, tomato paste and cumin. Sautee and simmer till most of liquid evaporates, about 8 minutes. Salt to taste and allow to cool before assembling tamales.
Depending the size of the corn husks you will need to use 1-2 husks per tamale. There are a billion ways to wrap a tamale: I like this way since it’s simple and makes super-cute traditional tamale shapes. Take corn husk and lay flat; spread about 2 T of dough about off-center, leaving about an inch and a half of space on the top and bottom. Spread a heaping tablespoon of filling on top, and on top of that dab about 1 T more of dough. Carefully roll up tamale, making sure to completely encase filling in corn husk. Tie both ends securely with either heavy duty kitchen string (maybe try different colors for different flavors), or simply tear a corn husk lenghth-wise into thin strips.
Prepare a large steamer basket and loosely pack tamales into it. Steam for 35-40 minutes. Tamales will expand and feel firm to the touch when done. Remove from heat and allow to cool slightly before serving (they will be really hot when unwrapped!). Serve with your favorite salsa, guacamole or make a whole affair out of it and serve with sides of rice and beans.
Creole Style Corn, Okra, and Tomatoes
Selected by Olivia. Adapted From VeganCehf.com.
Serves 6-8
- 1 1/2 cups onion, diced
- 1 cup green pepper, destemmed, deseeded, and diced
- 1 cup red pepper, destemmed, deseeded, and diced
- 1 jalapeno pepper, destemmed, deseeded, and diced
- 2 Tbsp. olive oil
- 10 oz. sliced okra
- 2 T. garlic, minced
- 2 cups frozen corn, thawed
- 2 cups tomatoes, deseeded, and diced
- 1 8 oz. can tomato sauce
- 2-3 tsp. Creole Seasoning, to taste
- 1/2 tsp. salt
Basic Potato Salad
Serves 8
- Coarse salt and ground pepper
- 3 pounds potatoes scrubbed and cut into 3/4-inch cubes
- 1/3 cup white-wine vinegar
- 4 scallions, white part minced, green part thinly sliced
- 3/4 cup light mayonnaise
- Steam potatoes with salted water.
- Meanwhile, in a large bowl, combine vinegar, scallion whites, 1 teaspoon coarse salt, and teaspoon pepper.
- Add hot potatoes to vinegar mixture; toss to combine. Cool to room temperature, tossing occasionally, about 1 hour.
- Add mayonnaise and scallion greens to cooled potatoes; mix gently to combine. Serve, or cover and refrigerate up to 2 days.
- 4 cups cabbage, shredded fine (I use green and red mixed)
- 1 cup carrots, shredded
- 10 radishes, shredded
- 1/2 cup sugar
- 1 teaspoon salt
- 1 tablespoon malt vinegar
- 1 cup mayonnaise
- Shred cabbage, sprinkle with sugar and salt.
- Let set for two hours or longer.
- Turn mixture over a couple of time while cabbage is leaching its juices.
- Drain liquid from bowl.
- Add rest of the ingredients, toss and serve.
- May be chilled and served the next day.
Radish Hot & Sour Soup
Serves 4-6
- 5 cups chicken stock
- 1/4 cup rice vinegar
- 2 T sugar
- 1/4 tsp. cayenne pepper
- 1/4 tsp. ground (dried) ginger
- 1 pound raw shrimp, peeled and deveined
- 6 oz. sliced radishes, about 1 1/2 cups
- 1 1/2 cups spinach leaves, shredded
- 2/3 cups thinly sliced green onions
In a large saucepan over medium heat, bring stock to a boil. Stir in vinegar, sugar, cayenne and ginger. Add shrimp and cook until shrimp turn pink and curl, about 3-4 minutes. Turn off heat, stir in radishes, spinach and green onions. Cover and let stand 2-3 minutes before serving.
Baked Stuffed Tomatoes
- 4 large ripe tomatoes
- 1 can cream of mushroom soup
- Salt, pepper to taste
- Stuffing (see below)
- Buttered cracker crumbs
- 1 onion
- 1/2 green pepper, chopped
- 1 rib celery, chopped
- 2 tablespoons margarine
- 2 to 3 cups bread crumbs or cooked rice
- chopped tomato centers
For Stuffing:
Cook chopped onion, green pepper, and celery in the margarine for 5 minutes, or until tender, stirring occasionally.
"Three Sisters" Stew
Selected by Olivia. From In a Vegetarian Kitchen.
6 servings
In Native American mythology, squash, corn, and beans are known as of the "three sisters."
- 1 small sugar pumpkin or 1 large butternut or carnival squash (about 2 pounds)
- 1 tablespoon olive oil
- 1 medium onion, chopped
- 2 cloves garlic, minced
- 1/2 medium green or red bell pepper, cut into short, narrow strips
- 14- to 16-ounce can diced tomatoes, with liquid
- 2 cups cooked or canned pinto beans
- 2 cups corn kernels (from 2 large or 3 medium ears)
- 1 cup homemade or canned vegetable stock, or water
- 1 or 2 small fresh hot chiles, seeded and minced
- 1 teaspoon each: ground cumin, dried oregano
- Salt and freshly ground black pepper
- 3 to 4 tablespoons minced fresh cilantro
- Preheat the oven to 400 degrees.
- Cut the pumpkin or squash in half lengthwise and remove the seeds and fibers. Cover with aluminum foil and place the halves, cut side up, in a foil-lined shallow baking pan. Bake for 40 to 50 minutes, or until easily pierced with a knife but still firm (if using squash, prepare the same way). When cool enough to handle, scoop out the pulp, and cut into large dice. Set aside until needed.
- Heat the oil in a soup pot. Add the onion and sauté over medium-low heat until translucent. Add the garlic and continue to sauté until the onion is golden.
- Add the pumpkin and all the remaining ingredients except the last 2 and bring to a simmer. Simmer gently, covered, until all the vegetables are tender, about 20 to 25 minutes. Season to taste with salt and pepper.
- If time allows, let the stew stand for 1 to 2 hours before serving, then heat through as needed. Just before serving, stir in the cilantro. The stew should be thick and very moist but not soupy; add additional stock or water if needed. Serve in shallow bowls.
Tuesday, September 4, 2007
September 1st Newsletter: Those lovely ladyfingers...Okra!
CSA Week 12, Cycle B pick-up
What's new this week?
Compiled by Jessica V
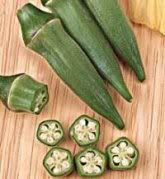
Okra (also known as gumbo or lady's finger), is a tall-growing, warm-season, annual vegetable from the same plant family as hibiscus and cotton. Okra is thought to be of African origin and was brought to the United States three centuries ago by enslaved Africans. The immature pods are used for soups, canning and stews or as a fried or boiled vegetable. Okra is a powerhouse of valuable nutrients, nearly half of which is soluble fiber in the form of gums and pectins. Soluble fiber helps to lower serum cholesterol, reducing the risk of heart disease. The other half is insoluble fiber which helps to keep the intestinal tract healthy decreasing the risk of some forms of cancer, especially colorectal cancer. Nearly 10% of the recommended levels of vitamin B6 and folic acid are also present in a half cup of cooked okra.
Nutrition Facts (1/2 cup sliced, cooked okra)
Calories 25
Dietary Fiber 2 grams
Protein 1.52 grams
Carbohydrates 5.76 grams
Vitamin A 460 IU
Vitamin C 13.04 mg
Folic acid 36.5 micrograms
Calcium 50.4 mg
Iron 0.4 mg
Potassium 256.6 mg
Magnesium 46 mg
Storage: Refrigerate unwashed, dry okra pods in the vegetable crisper, loosely wrapped in perforated plastic bags. Wet pods will quickly mold and become slimy. Okra will keep for only two or three days. When the ridges and tips of the pod start to turn dark, use it or lose it. Once it starts to darken, okra will quickly deteriorate. Cooked okra can be stored (tightly covered) in the refrigerator for 3 to 4 days.
Preparation: When cut, okra releases a sticky substance with thickening properties, often used in soups and stews. Gumbos, Brunswick stew, and pilaus are some well-known dishes which frequently use okra. Okra can be served raw, marinated in salads or cooked on its own, and goes well with tomatoes, onions, corn, peppers, and eggplant. Whole, fresh okra pods also make excellent pickles. Its mild flavor can be compared to eggplant, though the texture is somewhat unusual.
Recipes
Compiled by Jessica V
Okra and Corn with Tomatoes
Serve this Carolina favorite over a bowl of long-grain rice with a piece of hot cornbread. The okra should be young, not longer than 2 inches. Vine ripen tomatoes and fresh bell peppers add to the richness of this dish.
Arkansas Fried Okra
Olivia's Potato & Cucumber Salad
Slightly modified version of a recipe in How it all Vegan cookbook.
What's new this week?
Compiled by Jessica V
Okra (also known as gumbo or lady's finger), is a tall-growing, warm-season, annual vegetable from the same plant family as hibiscus and cotton. Okra is thought to be of African origin and was brought to the United States three centuries ago by enslaved Africans. The immature pods are used for soups, canning and stews or as a fried or boiled vegetable. Okra is a powerhouse of valuable nutrients, nearly half of which is soluble fiber in the form of gums and pectins. Soluble fiber helps to lower serum cholesterol, reducing the risk of heart disease. The other half is insoluble fiber which helps to keep the intestinal tract healthy decreasing the risk of some forms of cancer, especially colorectal cancer. Nearly 10% of the recommended levels of vitamin B6 and folic acid are also present in a half cup of cooked okra.
Nutrition Facts (1/2 cup sliced, cooked okra)
Calories 25
Dietary Fiber 2 grams
Protein 1.52 grams
Carbohydrates 5.76 grams
Vitamin A 460 IU
Vitamin C 13.04 mg
Folic acid 36.5 micrograms
Calcium 50.4 mg
Iron 0.4 mg
Potassium 256.6 mg
Magnesium 46 mg
Storage: Refrigerate unwashed, dry okra pods in the vegetable crisper, loosely wrapped in perforated plastic bags. Wet pods will quickly mold and become slimy. Okra will keep for only two or three days. When the ridges and tips of the pod start to turn dark, use it or lose it. Once it starts to darken, okra will quickly deteriorate. Cooked okra can be stored (tightly covered) in the refrigerator for 3 to 4 days.
Preparation: When cut, okra releases a sticky substance with thickening properties, often used in soups and stews. Gumbos, Brunswick stew, and pilaus are some well-known dishes which frequently use okra. Okra can be served raw, marinated in salads or cooked on its own, and goes well with tomatoes, onions, corn, peppers, and eggplant. Whole, fresh okra pods also make excellent pickles. Its mild flavor can be compared to eggplant, though the texture is somewhat unusual.
Recipes
Compiled by Jessica V
Okra and Corn with Tomatoes
Serve this Carolina favorite over a bowl of long-grain rice with a piece of hot cornbread. The okra should be young, not longer than 2 inches. Vine ripen tomatoes and fresh bell peppers add to the richness of this dish.
- 2 tablespoons each butter and canola oil
- 1 large onion, thinly sliced into rounds
- 2 bay leaves
- 1/2 teaspoon each thyme, red pepper flakes and basil
- 1 green bell pepper, seeded and finely diced
- 3 large fresh ripe, tomatoes seeded and chopped
- 4 ears corn, remove kernels, about 2 cups (may use frozen or canned whole kernel, drained)
- 2 cups small okra pods, left whole or 1/4-inch-thick rounds
- 1/2 cup water or vegetable stock
- 3/4 teaspoon salt
- 1/4 teaspoon black pepper
Arkansas Fried Okra
- 10-12 okra, sliced
- 2 med. potatoes, cubed
- 1 med. onion, chopped
- 1 t. salt
- pepper to taste
- 3 T. yellow corn meal
- 1 T. flour
- 6 T. margarine
Olivia's Potato & Cucumber Salad
Slightly modified version of a recipe in How it all Vegan cookbook.
- 3 C. potatoes, cubed
- 3 C. cucumber, cubed
- 1/3 C. onion
- 2 T. fresh parsley
- 1 T. Dijon Mustard
- 2 T. balsamic vinegar
- 1 T. wasabi sauce
- 1/4 C. flax oil (or extra virgin olive oil, if you prefer)
- 1/4 t. salt
- 1/4 t. pepper
- 1/4 to 1/2 t. Spike brand seasoning (or your favorite seasoning blend)
- Boil potatoes.
- Whisk together oil, parsley, mustard, vinegar, wasabi, salt, pepper, and Spike.
- Once potatoes can be pierced easily with a fork (be careful that they aren't too mussy/overcooked), drain and rinse them with cold water until cool.
- In a large bowl, mix potatoes, cucumbers, and dressing. Adjust seasonings to suit your tastes.
Saturday, August 25, 2007
August 25th Newsletter: Tomatillos…too fresh!
CSA Week 11, Cycle A pick-up
What's new this week?
Compiled by Jessica V.
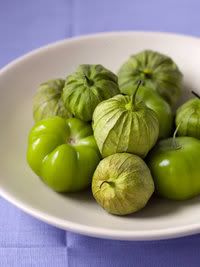
Tomatillos…too fresh!
Tomatillo (pronounced toe-mah-tee-yo), a primary ingredient in Latin American green sauce (salsa verde), means "little tomato" in Spanish — but these beauties pack a lot of flavor into their small containers. With a distinctly tart, almost lemony flavor, tomatillos enhance a broad range of dishes, from guacamole and appetizers to stews and steaks.
The fruit of the tomatillo grows within a soft, parchment-like husk that is sometimes forced open as it approaches mature size, usually between 1" to 2" in diameter. Tomatillos are almost always harvested and used while still green. A yellowish or sometimes purplish blush on the fruit itself — the husk can be pale green to light brown — indicates a ripeness that makes them less desirable for common uses.
Tomatillos are sometimes used to flavor rice and tenderize meat. By far the most common role is as a base for salsa verde, usually combined with onions, cilantro, garlic, lime juice and chili peppers.
If you're not going to use them immediately, keep the husks on and store in a paper bag in the crisper drawer of the refrigerator for up to three weeks — do not keep in an airtight container. Tomatillos freeze well. Simply remove the husks and place in a suitable container for freezing. When needed, take out the desired amount and thaw at room temperature.
from Whole Foods Market website
Recipes
Compiled by Retu.
Guacamole en Molcajete con Tomate Verde
1 hour 20 minutes 20 mins prep
Yield: 4 servings
Community News
Compiled by Olivia.
New Local Business Opening Today! twofiftyeight Cafe on 199 Malcolm X Boulevard (between Jefferson and Putnam). Read about it on BedStuyBlog.com!
Midnight Smoothie Madness event at Common Grounds this evening from 9:00 PM- midnight. Read about it on BedStuyBlog.com!
Next Friday, Aug 31st @ 8 PM, marks the final evening of the 8th Annual KidFlix film festival in Fulton Park!
Year Up, an intensive one-year training program for young adults who provide Fortune 100 companies with IT entry level talent, is currently recruiting High School graduates or GED recipients, ages 18 - 24. For more information: Visit www.yearup.org or contact admissions specialist, Wil Velazquez at 212-785-3340, ext. 1304 or wvelazquez@yearup.org
What's new this week?
Compiled by Jessica V.
Tomatillos…too fresh!
Tomatillo (pronounced toe-mah-tee-yo), a primary ingredient in Latin American green sauce (salsa verde), means "little tomato" in Spanish — but these beauties pack a lot of flavor into their small containers. With a distinctly tart, almost lemony flavor, tomatillos enhance a broad range of dishes, from guacamole and appetizers to stews and steaks.
The fruit of the tomatillo grows within a soft, parchment-like husk that is sometimes forced open as it approaches mature size, usually between 1" to 2" in diameter. Tomatillos are almost always harvested and used while still green. A yellowish or sometimes purplish blush on the fruit itself — the husk can be pale green to light brown — indicates a ripeness that makes them less desirable for common uses.
Tomatillos are sometimes used to flavor rice and tenderize meat. By far the most common role is as a base for salsa verde, usually combined with onions, cilantro, garlic, lime juice and chili peppers.
If you're not going to use them immediately, keep the husks on and store in a paper bag in the crisper drawer of the refrigerator for up to three weeks — do not keep in an airtight container. Tomatillos freeze well. Simply remove the husks and place in a suitable container for freezing. When needed, take out the desired amount and thaw at room temperature.
from Whole Foods Market website
Recipes
Compiled by Retu.
Guacamole en Molcajete con Tomate Verde
- 2 ripe avocados
- 6 tomatillos
- 2 cloves of garlic
- 1 yellow or white onion
- 2 tablespoons of cilantro
- serrano chili as desired
- salt
- Roast the chilies and tomatillos.
- Grind up the garlic with the salt and chiles in a molcajete (mortar and pestal).
- Once well ground, add the tomatillos, avocados and grind a little more.
- To garnish the guacamole, put sliced onion and chopped cilantro on top. Serve immediately.
1 hour 20 minutes 20 mins prep
- 3 cups prepared tomatillos (about 1-3/4 lb tomatillos)
- 1/2 cup fresh lemon juice
- 7-1/2 cups sugar, measured into separate bowl (See tip below.)
- 1/2 tsp. butter or margarine (optional)
- 2 pouches CERTO Fruit Pectin
- Bring boiling-water canner, half-full with water, to simmer. Wash jars and screw bands in hot, soapy water; rinse with warm water. Pour boiling water over flat lids in saucepan off the heat. Let stand in hot water until ready to use. Drain well before filling.
- Finely chop or grind tomatillos. Measure exactly 3 cups prepared tomatillos into 6- or 8-quart saucepot. Add lemon juice.
- Stir sugar into prepared tomatillos in saucepot. Add butter to reduce foaming, if desired. Bring mixture to full rolling boil (a boil that doesn't stop bubbling when stirred) on high heat, stirring constantly.
- Stir in pectin quickly. Return to full rolling boil and boil exactly 1 minute, stirring constantly. Remove from heat. Skim off any foam with metal spoon.
- Ladle quickly into prepared jars, filling to within 1/8 inch of tops. Wipe jar rims and threads. Cover with two-piece lids. Screw bands tightly. Place jars on elevated rack in canner. Lower rack into canner. Water must cover jars by 1 to 2 inches; add boiling water if needed. Cover; bring water to gentle boil. Process 10 minutes. Remove jars and place upright on a towel to cool completely. After jars cool, check seals by pressing middle of lid with finger. (If lid springs back, lid is not sealed and refrigeration is necessary.)
Yield: 4 servings
- 8 cups mixed salad, washed, patted dry, and torn into bite-size pieces
- 1 head fennel bulb, thinly sliced
- 1/4 cup pecan pieces, toasted
- 1/4 cup Gorgonzola cheese, crumbled
- 1/4 cup dried cranberries
- 4 tablespoons light bottled balsamic vinaigrette (with more on the table in case someone would like to add more)
- In 4 bowls, arrange in each, a mixture of the escarole, arugula and endive slices. Top each with pecans, Gorgonzola, and cranberries.
- Drizzle a tablespoon over each bowl and serve.
- 3 Medium To Small Eggplants
- 1 Pound Mozzarella
- 2 Eggs
- 1 1/2 Cups Seasoned Bread Crumbs
- Fresh Basil Leaves
- Oil For Deep Frying
- Salt & Pepper
Community News
Compiled by Olivia.
New Local Business Opening Today! twofiftyeight Cafe on 199 Malcolm X Boulevard (between Jefferson and Putnam). Read about it on BedStuyBlog.com!
Midnight Smoothie Madness event at Common Grounds this evening from 9:00 PM- midnight. Read about it on BedStuyBlog.com!
Next Friday, Aug 31st @ 8 PM, marks the final evening of the 8th Annual KidFlix film festival in Fulton Park!
Year Up, an intensive one-year training program for young adults who provide Fortune 100 companies with IT entry level talent, is currently recruiting High School graduates or GED recipients, ages 18 - 24. For more information: Visit www.yearup.org or contact admissions specialist, Wil Velazquez at 212-785-3340, ext. 1304 or wvelazquez@yearup.org
Saturday, August 18, 2007
August 18th Newsletter: Farm trip tomorrow!
CSA Week 10, Cycle B pick-up
Today's pick-up hours are from 10 am- 12 Noon, due to farm trip. Members can harvest their share during the visit to Hector's farm tomorrow.
Community Food Educator and CSA member, Madea Allen, will be hosting another great cooking demo at the stand today. ( FYI: Cooking demos are presented the 1st and 3rd Saturday of each month.)
Bed-Stuy CSA Farm Trip!
Tomorrow, Sunday, August 19th
10 AM - 5 PM
New Paltz, NY
Members will be able to arrive anytime between 10am - 4pm to take a tour of the farm, harvest some of their shares, relax and enjoy the space your food comes from. We will also have lunch on the farm at 1pm. Bring your children!!!
The farm is located at 217 Springtown Road in New Paltz, NY. It takes a little under 2 hours to drive there. (Driving directions from Magnolia Tree Earth Center.)
What's new this week?
Compiled by Veggie Guru, Jessica V.
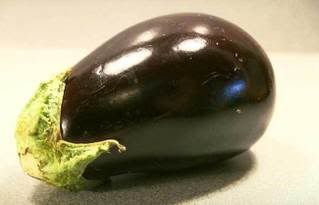
Eggplant is tear-shaped, and usually purple-black in color. A member of the nightshade family, eggplant is related to the tomato and potato. Though commonly thought of as a vegetable, it is actually a fruit ... specifically, a berry. Its fleshy and substantive texture makes it a good replacement for meat.
Selection: Choose eggplant with bright, shiny, taut skin and no soft spots. Larger eggplants are more likely to have lots of seeds and a bitter flavor.
Storage and handling: Eggplant can be kept on the countertop for several days.
Preparation: Trim the green caps and slice or dice the flesh. To peel or not to peel -- the choice is up to you. If it's very fresh, it won't need peeling, but as eggplant ages, the skin tends to get tougher. In some recipes leaving the skin on is actually an advantage since it not only adds color, but also helps cut-up pieces hold their shape. Salting older eggplant before cooking removes bitter flavors. Cut as desired, sprinkle with salt, leave in colander for 30 minutes, squeeze gently and pat dry. Sauté salted, drained cubes in small amount of hot oil 6-8 minutes, stirring or shaking constantly, until browned and tender. Broil peeled slices, brushed with oil and placed on a broiler pan rack, 5 inches from heat source until browned on each side. Microwave cubed eggplant, covered, 3-4 minutes. Don't be tricked into using too much oil -- eggplant is very porous and soaks up oil like a sponge, so beware when sautéing or stir-frying. If the eggplant absorbs all the oil in the pan, don't add more (1 tablespoon per pound is enough). Cut surfaces will brown quickly when exposed to air but won't affect flavor when cooked.
Serving suggestions: Not usually eaten raw. Sauté eggplant with other vegetables or with garlic and herbs. Roasted eggplant can be topped with a thin layer of pesto or olive tapenade, or sprinkled with cheese then broiled. Try eggplant burgers.
Nutrients (when cooked): Fat, sodium and cholesterol free. Low in calories.
Recipes
Compiled by Recipe Guru, Retu.
Cauliflower cakes
Serve with a little hot sauce or anything else you think goes!
Baba Ghanouj
Spicy Eggplant Stir-Fry
Roasted Broccoli
(from Olivia's kitchen.)
8th Annual KIDflix outdoor film festival in Bed-Stuy continues!
Free family fun every FRIDAY night in AUGUST at 8:00 PM (RAIN date sat. night) in beautiful FULTON PARK, stuyvesant & fulton (a / c to utica). live performances! give-aways! contests! prizes! surprises! Presented by MoCADA and African Film Festival New York. More info.
Arsty-Craftsy People Wanted! The Bed-Stuy Craft Group will have its first meeting on Sunday August 26th at 1 PM. Meeting will be held at Tiny Cup cafe on corner of Nostrand Avenue and Clifton Place. Future meetings will be held on 1st and 3rd Sundays of each month. (Locations TBD.) Please contact sugarshakesATgmail.com to join!
Today's pick-up hours are from 10 am- 12 Noon, due to farm trip. Members can harvest their share during the visit to Hector's farm tomorrow.
Community Food Educator and CSA member, Madea Allen, will be hosting another great cooking demo at the stand today. ( FYI: Cooking demos are presented the 1st and 3rd Saturday of each month.)
Bed-Stuy CSA Farm Trip!
Tomorrow, Sunday, August 19th
10 AM - 5 PM
New Paltz, NY
Members will be able to arrive anytime between 10am - 4pm to take a tour of the farm, harvest some of their shares, relax and enjoy the space your food comes from. We will also have lunch on the farm at 1pm. Bring your children!!!
The farm is located at 217 Springtown Road in New Paltz, NY. It takes a little under 2 hours to drive there. (Driving directions from Magnolia Tree Earth Center.)
What's new this week?
Compiled by Veggie Guru, Jessica V.
Eggplant is tear-shaped, and usually purple-black in color. A member of the nightshade family, eggplant is related to the tomato and potato. Though commonly thought of as a vegetable, it is actually a fruit ... specifically, a berry. Its fleshy and substantive texture makes it a good replacement for meat.
Selection: Choose eggplant with bright, shiny, taut skin and no soft spots. Larger eggplants are more likely to have lots of seeds and a bitter flavor.
Storage and handling: Eggplant can be kept on the countertop for several days.
Preparation: Trim the green caps and slice or dice the flesh. To peel or not to peel -- the choice is up to you. If it's very fresh, it won't need peeling, but as eggplant ages, the skin tends to get tougher. In some recipes leaving the skin on is actually an advantage since it not only adds color, but also helps cut-up pieces hold their shape. Salting older eggplant before cooking removes bitter flavors. Cut as desired, sprinkle with salt, leave in colander for 30 minutes, squeeze gently and pat dry. Sauté salted, drained cubes in small amount of hot oil 6-8 minutes, stirring or shaking constantly, until browned and tender. Broil peeled slices, brushed with oil and placed on a broiler pan rack, 5 inches from heat source until browned on each side. Microwave cubed eggplant, covered, 3-4 minutes. Don't be tricked into using too much oil -- eggplant is very porous and soaks up oil like a sponge, so beware when sautéing or stir-frying. If the eggplant absorbs all the oil in the pan, don't add more (1 tablespoon per pound is enough). Cut surfaces will brown quickly when exposed to air but won't affect flavor when cooked.
Serving suggestions: Not usually eaten raw. Sauté eggplant with other vegetables or with garlic and herbs. Roasted eggplant can be topped with a thin layer of pesto or olive tapenade, or sprinkled with cheese then broiled. Try eggplant burgers.
Nutrients (when cooked): Fat, sodium and cholesterol free. Low in calories.
Recipes
Compiled by Recipe Guru, Retu.
Cauliflower cakes
- 1 head cauliflower, boiled
- 1/4 cup parsley, chopped
- 1/2 cup parmesan, grated
- 2 eggs
- 4 tablespoons flour
- salt and pepper to taste
- olive oil for frying
Serve with a little hot sauce or anything else you think goes!
Baba Ghanouj
- 1 med. size eggplant (12 oz. - 375 gm.)
- 1/4 cup lemon juice
- 1/4 cup tahini
- 2 cloves garlic
- 2 teaspoons salt or to taste
- 1 tablespoon olive oil
- 1/4 cup finely chopped parsley (optional)
- Grill eggplant over charcoal fire or place over center shelf in hot oven (375-400 degrees) on a baking dish.
- Bake until soft, after 1/2 hour check if it is soft by poking with a fork. You can also cook in the microwave for 10 to 15 minutes.
- Wait till it cools, then peel off the stem, or chop ends off and remove skin by sliding off.
- Chop up entire eggplant, and puree in blender or mash with fork until creamy.
- Mix rest of ingredients in and continue pureeing or mashing. Adjust lemon juice and salt to taste.
Spicy Eggplant Stir-Fry
- 5 Japanese eggplants (about 2 pounds)
- 1 teaspoon salt
- 2 tablespoons vegetable oil
- 6 garlic cloves, minced
- 1 small onion, sliced
- 1/4 cup soy sauce
- 2 tablespoons sesame oil
- 1 tablespoon rice wine or dry white vermouth
- 1 tablespoon rice vinegar
- 1 teaspoon Asian chili sauce
- 2 green onions, thinly, sliced
- 1/2 sweet red pepper, diced
- Trim off eggplant stems.
- Cut eggplant in half lengthwise, cut each half lengthwise into 1-inch (2. 5 cm) thick strips.
- Cut each strip into 2-inch (5 cm) pieces; place in colander.
- Sprinkle with salt; let stand for 1 hour.
- Pat dry.
- In large wok or shallow Dutch oven, heat oil over medium-high heat; stir-fry garlic and onion for 2 minutes.
- Add eggplant; stir-fry for 5 minutes.
- Meanwhile, in bowl, whisk together sauce ingredients; pour into wok, cover and cook, stirring often, for 5 minutes or until eggplant is tender.
- Sprinkle with green onions and red pepper.
- 1 lb of zucchini (about 2 medium sized), coarsely grated
- Kosher salt
- Ground black pepper
- 1 large egg
- 2 scallions, finely chopped
- 1/2 cup all-purpose flour
- 1/2 cup grape seed oil or olive oil
- Sour cream or plain yogurt
- Salt the zucchini with about 1 teaspoon of salt. Try to remove the excess moisture from the zucchini by either squeezing the liquid out with a potato ricer, or by squeezing with paper towels. (The original recipe calls for putting the zucchini in a colander set in the sink to let it drain for 10 minutes after salting it. I think it works much better to use a potato ricer.)
- Whisk egg in a large bowl; add the zucchini, flour, scallions, and 1/4 teaspoon of pepper. Mix to combine well.
- Heat oil in a large skillet over medium heat. Cook fritters in two batches. Drop six mounds of batter (2 Tbsp each) into the skillet. Flatten slightly. Cook, turning once, until browned, 4-6 minutes on each side. Transfer to a paper towel-lined plate. Sprinkle with salt. Repeat with remaining batter.
- Serve immediately, with sour cream or plain yogurt on the side.
Roasted Broccoli
(from Olivia's kitchen.)
- 1 head of broccoli, washed and cut into florets
- 2 teaspoons of olive oil
- juice of one lemon
- salt and pepper, to taste
- Preheat oven to 400 degrees. Use a large bowl to toss broccoli florets with olive oil, salt, and pepper. Lay florets in a single layer on a baking sheet. (You can pile in uncovered glass casserole dish, if you don't have a baking sheet; it just takes longer to cook.)
- Bake until tender and kinda brown, about 20 minutes. Right after you take the florets out of the oven, squeeze cut lemon over the broccoli.
- Eat as side dish or pair with any grain like quinoa, couscous, or brown rice.
- You can try this cooking technique on most veggies!
8th Annual KIDflix outdoor film festival in Bed-Stuy continues!
Free family fun every FRIDAY night in AUGUST at 8:00 PM (RAIN date sat. night) in beautiful FULTON PARK, stuyvesant & fulton (a / c to utica). live performances! give-aways! contests! prizes! surprises! Presented by MoCADA and African Film Festival New York. More info.
Arsty-Craftsy People Wanted! The Bed-Stuy Craft Group will have its first meeting on Sunday August 26th at 1 PM. Meeting will be held at Tiny Cup cafe on corner of Nostrand Avenue and Clifton Place. Future meetings will be held on 1st and 3rd Sundays of each month. (Locations TBD.) Please contact sugarshakesATgmail.com to join!
Saturday, July 28, 2007
July 28th Newsletter: Something Radical….Radicchio!
CSA Week 7, Cycle A pick-up
What's new this week?
Compiled by Veggie Guru, Jessica.
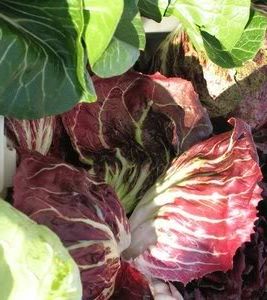
Something Radical….Radicchio!
Radicchio is actually a leaf chicory, sometimes known as Italian chicory. This vegetable is very popular in Italy and has gained in popularity in the United States in the last few years. It has a bitter and spicy taste, which mellows when it is grilled or roasted. It can also be used to add color and zest to salads. In Italy, it is often eaten grilled in olive oil, or mixed into dishes such as risotto, while in the United States it is often eaten raw in salads.
A 1 cup (shredded) serving of Radicchio has 9.2 calories It is high in magnesium, potassium, and has 10.8 I.U. of vitamin A. It is 70% carbohydrate with just a small amount of protein and just a trace of fat.
To store freshly picked heads simply brush any dirt off the exterior and put in a plastic bag and place in the refrigerator. It will keep approximately a week. When you are ready to use the leaves simply pull the leaves off the head and rinse in cool water.

Mom was right…Broccoli is good!
Broccoli is a member of the cabbage family, and is closely related to cauliflower. Its cultivation originated in Italy. Broccolo, its Italian name, means "cabbage sprout." Because of its different components, broccoli provides a range of tastes and textures, from soft and flowery (the floret) to fibrous and crunchy (the stem and stalk). Do not let the smell of the sulfur compounds that are released while cooking keep you away from this highly nutritious vegetable.
Broccoli is the superhero of the vegetable kingdom with its rich vitamin C and A content. Serving size, 1 med. Stalk (140g): Low-calorie, Low-fat, Low-sodium, High in fiber.
Broccoli should be left unwashed when storing. Store in the refrigerator in a plastic bag, leaving the bag open or use a perforated plastic bag. This will avoid excess moisture, which causes mold to grow. Store up to 5 days. Broccoli can be blanched and then frozen and kept in the freezer for up to a year. Broccoli is very sensitive to ethylene, which is a gas given off by some fruits and vegetables. The gas speeds up the ripening process so broccoli should not be stored with ethylene producing fruits and vegetables, such as, apples, apricots, bananas, cantaloupe, kiwifruit, mango, peaches, pears, tomato, and white sapote.
Recipes
Compiled by Recipe Guru, Retu.
Broccoli and tofu in garlic sauce
A vegan and vegetarian entree that is easy to prepare.
2-4 servings; 20 min - 10 min prep
What's new this week?
Compiled by Veggie Guru, Jessica.
Something Radical….Radicchio!
Radicchio is actually a leaf chicory, sometimes known as Italian chicory. This vegetable is very popular in Italy and has gained in popularity in the United States in the last few years. It has a bitter and spicy taste, which mellows when it is grilled or roasted. It can also be used to add color and zest to salads. In Italy, it is often eaten grilled in olive oil, or mixed into dishes such as risotto, while in the United States it is often eaten raw in salads.
A 1 cup (shredded) serving of Radicchio has 9.2 calories It is high in magnesium, potassium, and has 10.8 I.U. of vitamin A. It is 70% carbohydrate with just a small amount of protein and just a trace of fat.
To store freshly picked heads simply brush any dirt off the exterior and put in a plastic bag and place in the refrigerator. It will keep approximately a week. When you are ready to use the leaves simply pull the leaves off the head and rinse in cool water.
Mom was right…Broccoli is good!
Broccoli is a member of the cabbage family, and is closely related to cauliflower. Its cultivation originated in Italy. Broccolo, its Italian name, means "cabbage sprout." Because of its different components, broccoli provides a range of tastes and textures, from soft and flowery (the floret) to fibrous and crunchy (the stem and stalk). Do not let the smell of the sulfur compounds that are released while cooking keep you away from this highly nutritious vegetable.
Broccoli is the superhero of the vegetable kingdom with its rich vitamin C and A content. Serving size, 1 med. Stalk (140g): Low-calorie, Low-fat, Low-sodium, High in fiber.
Broccoli should be left unwashed when storing. Store in the refrigerator in a plastic bag, leaving the bag open or use a perforated plastic bag. This will avoid excess moisture, which causes mold to grow. Store up to 5 days. Broccoli can be blanched and then frozen and kept in the freezer for up to a year. Broccoli is very sensitive to ethylene, which is a gas given off by some fruits and vegetables. The gas speeds up the ripening process so broccoli should not be stored with ethylene producing fruits and vegetables, such as, apples, apricots, bananas, cantaloupe, kiwifruit, mango, peaches, pears, tomato, and white sapote.
Recipes
Compiled by Recipe Guru, Retu.
Broccoli and tofu in garlic sauce
A vegan and vegetarian entree that is easy to prepare.
- 1 onion, diced
- 4 cloves garlic, minced
- 3 tbsp olive oil
- approx 2 cups broccoli, chopped
- 1 pound firm or extra firm tofu, pressed
- 1 1/2 tsp ginger powder
- 1/4 tsp cayenne pepper
- 3 tbsp corn starch
- 1/4 cup soy sauce
- 1 cup water
- Cut tofu into 1 inch cubes.
- In a large skillet, sautee onions and garlic in olive oil until onions turn clear, about 3-5 minutes.
- Add the tofu, ginger, cayenne and broccoli to the pan and continue to cook until broccoli is done, another 6-8 minutes.
- In a separate small bowl, mix together the corn starch, soy sauce and water, then add this mixture to the broccoli and tofu. Cook until sauce thicken, then remove from heat.
- Serve over rice or whole grains and enjoy!
2-4 servings; 20 min - 10 min prep
- 2 cups chopped cabbage
- 1 cup of diced potatoes
- 1-2 green chilies
- 1/4 teaspoon mustard seeds
- 1/4 teaspoon cumin seeds
- 1/4 teaspoon turmeric powder
- 1/4 teaspoon garam masala
- 1/2 teaspoon ginger paste
- 1/2 teaspoon garlic paste
- 1/2 cup chopped onions
- 1 teaspoon oil
- 1 teaspoon chopped cilantro
- salt
- Heat the oil.
- Add the cumin and mustard seeds.
- Add ginger, garlic, chillies and onions.
- Cook till the onions are a little soft.
- Add the potatoes and cabbage.
- Add salt and turmeric powder.
- Cook till the consistency which you like your cabbage and potatoes to be cooked.
- Add chopped cilantro.
- Serve with Indian bread.
- 6 cups chicken broth, heated
- 4 tbsp unsalted butter - 2 tbsp removed To finish the dish
- 1 cup finely chopped onion
- 2 cups arborio rice
- 1 cup dry white wine
- 1 cup grated Parmesan Cheese
- 1 & 1/2 cups finely shredded radicchio leaves
- 1/4 cup light cream
- 2 tablespoons freshly chopped parsley
- 1/3 cup grated Parmesan cheese
- Heat the 4 tablespoons of butter in a heavy saucepan. Add the onions and cook until they are translucent.
- Add the rice and stir until it is well coated with the butter.
- Add the white wine and stir continually over medium heat until it is absorbed.
- Add the radicchio leaves and mix well. Start to add 1/2 cup of hot broth, stirring as it is absorbed.
- Continue in this manner, adding ladles full of hot broth and stirring continuously for about 20-25 minutes or until the rice is cooked, but remains slightly firm to the teeth.
- Remove from the heat, add the cream, parsley and the parmesan cheese.
- Serve, offering additional cheese if desired. Serves 4-6.
Subscribe to:
Posts (Atom)